I think you’ll agree with me when I say:
SEO can be very beneficial to your eCommerce business.
That’s probably why you’ve landed on this post.
You’ve optimized for keywords, site structure, internal and external links, and might’ve even downloaded a SEO app from the Shopify app store … but you still aren’t ranking on the first page of Google.
Don’t worry, you’re not the only one.
I’ve seen many other eCommerce companies come to our agency with the exact same problem. And we’ve turned their Shopify SEO woes into wins every time.
In this post I’ll tell you 5 reasons why you’re still not ranking on the first page of Google and how you can instantly fix them so you can outrank your competitors in 2021.
Let’s dive right in.
1. Duplicate Content
One of the biggest problems Shopify users run into when it comes to SEO is duplicate content.
This means that you have two or more pages on your site that are exactly or nearly the same.
Why is duplicate content bad? Because Google won’t know which page should be the canonical (preferred) version that you want to rank for.
It’s forced to guess between two different URLs with identical content, which can result in split traffic between the pages, ultimately hurting your chances of appearing on the first page of a Google search.
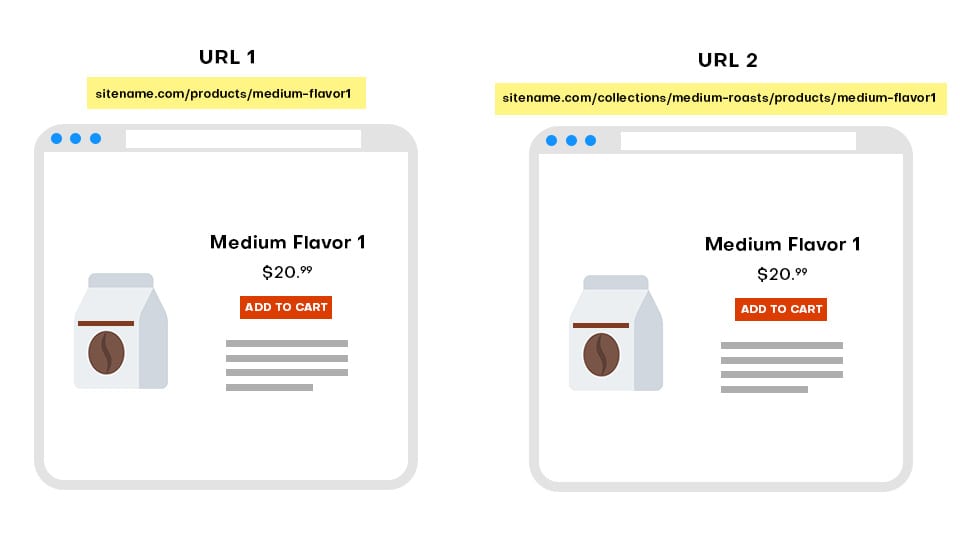
For example, let’s say you run a coffee subscription business.
You have different categories, or “collections” as Shopify calls them, that include Light Roasts, Medium Roasts, Dark Roasts and Decaf.
One of the product links will look like this: sitename.com/products/medium-flavor1
This is the canonical version.
However, if you go to the Medium Roasts collections/category page and click on the Medium Flavor 1 product, you’ll be directed to this url:
sitename.com/collections/medium-roasts/products/medium-flavor1
This is the non-canonical version.
And while Shopify usually accounts for this and has the non-canonical (incorrect) links point to the canonical (correct) links, it still fails to solve the issue of duplicate content because it automatically links to the non-canonical versions on all of your category pages.
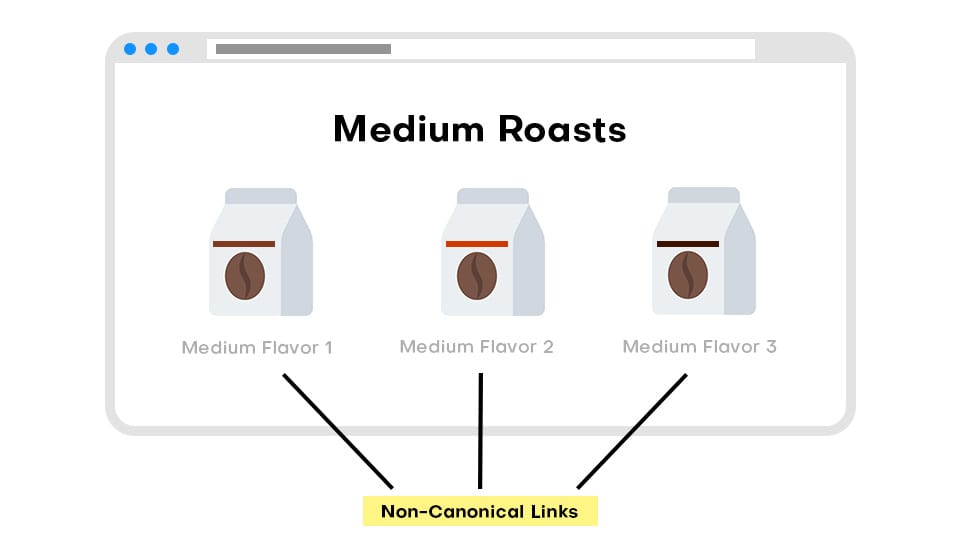
In other words, Shopify creates your entire site structure with the wrong links.
And this confuses Google because the pages you internally link to the most are non-canonical (the ones you don’t want to rank for) while the pages you internally link to the least are canonical (the ones you do want to rank for).
2. Incorrect H Tags
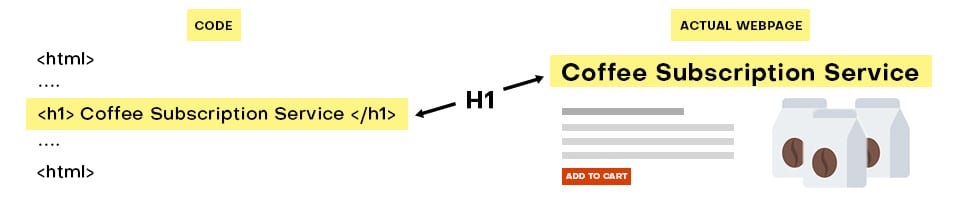
If you’ve done any digging into SEO, you’ve probably learned that editing your H tags can help your website rank higher because they help create a better user experience.
H tags (more specifically, your H1 tags) are basically titles within each page’s code that tell both the readers and the search engines what that page is going to be about.
You’ll typically want to include the keywords you’re optimizing for (Ex. Coffee subscription service) in your H1 tag. Long-tail keywords can be the most effective.
Each page on your website should only have one H1 tag.
However, if your H tags get mixed up, like certain Shopify themes have been found to do, your H1 could actually be turned into your H2 while your H2 and H3 can be turned into H1s, giving your page multiple H1 tags.
And this issue can not only confuse Google as to what the page is actually about, but it could also misinform potential customers, causing them to leave the page.
Using the coffee subscription business as an example, let’s revisit the Medium Roasts collections/category page.
On this page, the title and H1 are “Subscription Coffee – Medium Roast Flavors.”
Some Shopify themes may incorrectly label this as the H2.
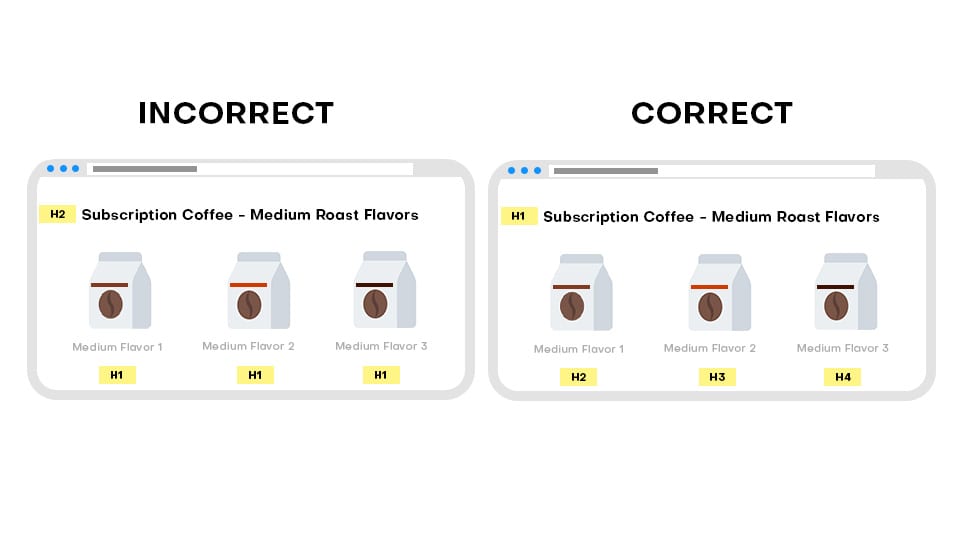
The individual product titles (Ex. Medium Flavor 1, Medium Flavor 2, etc.), which should be labeled as H2s, H3s, or H4s, are incorrectly labeled as H1s.
And while this problem isn’t necessarily the end of the world for your website, it damages the user experience and misses out on a valuable opportunity to provide Google all the information it desires to understand your site.
3. Product Redirect Pages
Have you recently removed a product page from your site? Or changed a page’s URL?
Have you implemented page redirects to accommodate these changes?
If not, you’ve run into another predictable Shopify SEO issue.
Product redirect pages are vital to a website’s success because they allow users to easily navigate your site and search engines to easily crawl your site.
They create a better user experience and will help decrease bounce rate, ultimately benefitting your SEO in the long run.
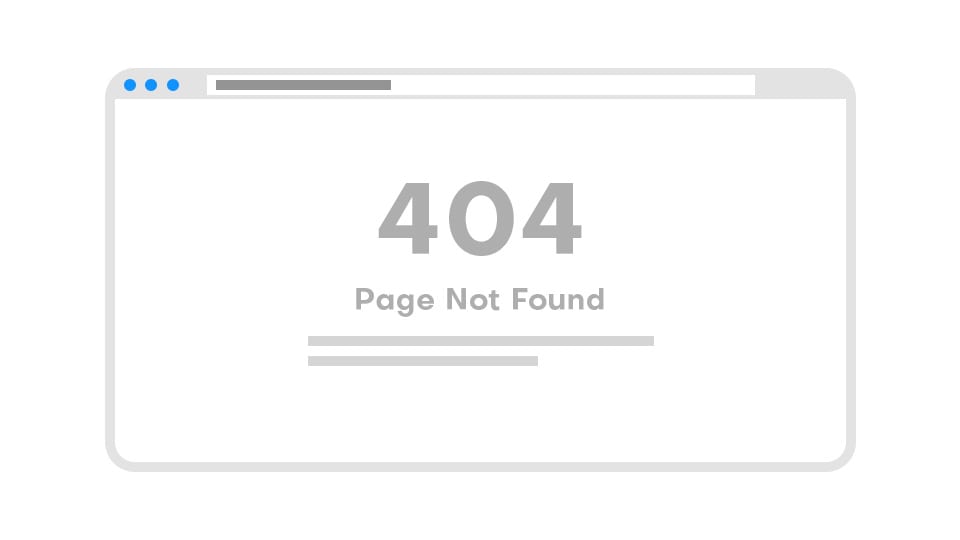
But if you’re not creating URL redirects for old or expired pages, your users are going to be hit with the infamous 404 error page.
And when a visitor lands on a 404 page, they’re going to instantly leave your site.
Which means no sale for you.
For example, let’s say you have a product that you thought would be in high demand, but it turns out you’re actually losing money on this product.
So you decide to remove it from your online store. Page deleted.
But what if a potential customer had bookmarked this product URL and wanted to revisit the page at a later date because they were on the fence about buying it?
When they go back to visit the bookmarked URL for a page you have since removed, they’ll be presented to a 404 page.
Unless … you’ve implemented a product redirect page.
If you’ve implemented a product redirect page for the expired URL, your customer will click their bookmarked URL and instead be redirected to a similar product from your store.
This can not only increase the amount of time they spend on your site, but can also increase the likelihood of a conversion.
Long story short, if you’re not keeping your URLs up to date, you’re likely leaving money on the table.
4. Robots TXT Files
Before you open a new tab and type “What is a robots txt file” into the search bar, let me save you the time.
A Robots.txt file is a very small text file that every website in the world has. It tells search engines which pages on your site they can or cannot access, or “crawl,” to gather information about your site.
While it may seem like you’d want these search engines to crawl every single page of your site to gather the most amount of information, that’s not actually the case.
You don’t want Google’s crawlers to search every page on your site because: 1. Too many crawl requests can slow down your site and 2. Allowing Google to crawl unimportant or similar pages on your site can have a negative effect on your ranking.
So to give Google’s robot crawlers the proper instructions and boost your SEO, you need to optimize your Robots.txt file.
Unfortunately, with Shopify, you don’t have that luxury.
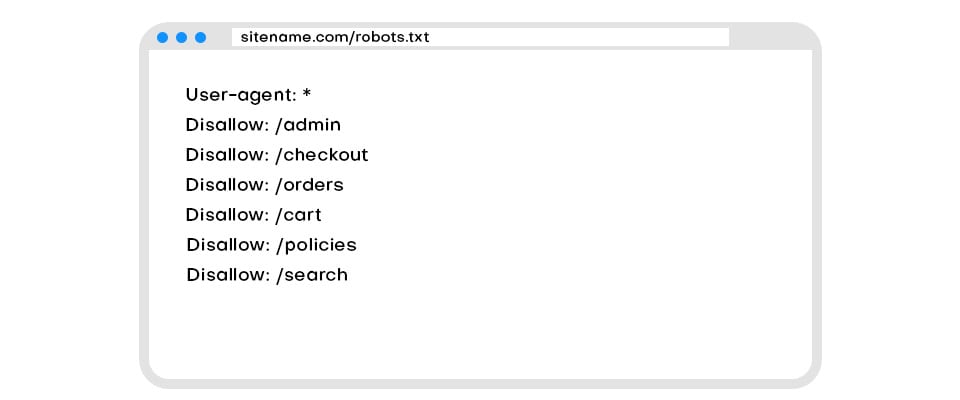
As Shopify has stated within its Help Center, it doesn’t allow you to edit the content of your store’s Robots.txt file. However, it does automatically block some sections of your site from being crawled to help with SEO.
Some of those sections include your admin area, checkout, orders, shopping cart, internal search and policies page.
But while Shopify does offer a few default disallow commands, they’re not difference-makers because there are most likely additional pages on your site that you don’t want Google to crawl that you may not be aware of.
To get the most out of your SEO, you need to have lots of flexibility when it comes to what Google can and can’t crawl on your site. When you’re limited in your ability to do that, you’re letting a good opportunity go to waste.
5. Meta Descriptions & Title Tags
Editing your meta descriptions and title tags is vital for SEO success. They’re arguably the most important factors for SEO.
These should include any keywords you’re optimizing for and give users a short description of what your page is about.
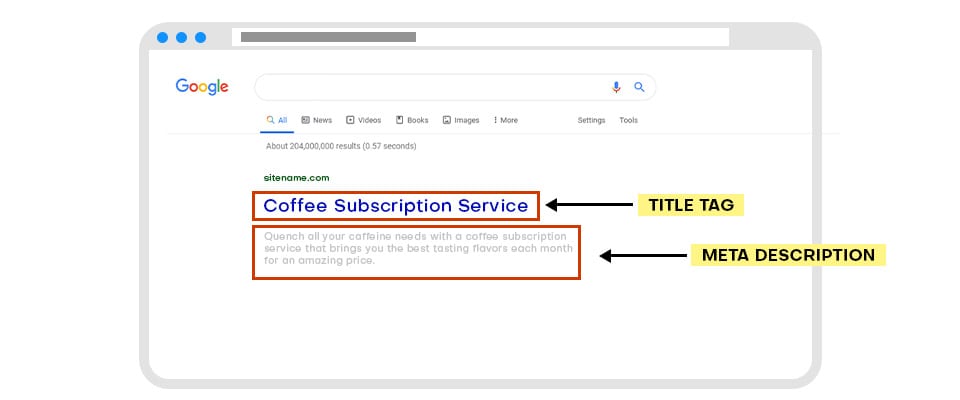
The stronger your titles and descriptions are, the more likely someone is going to click on your link and visit your store.
The good news is Shopify gives you plenty of space (70 characters for titles and 320 characters for meta descriptions) to edit these fields.
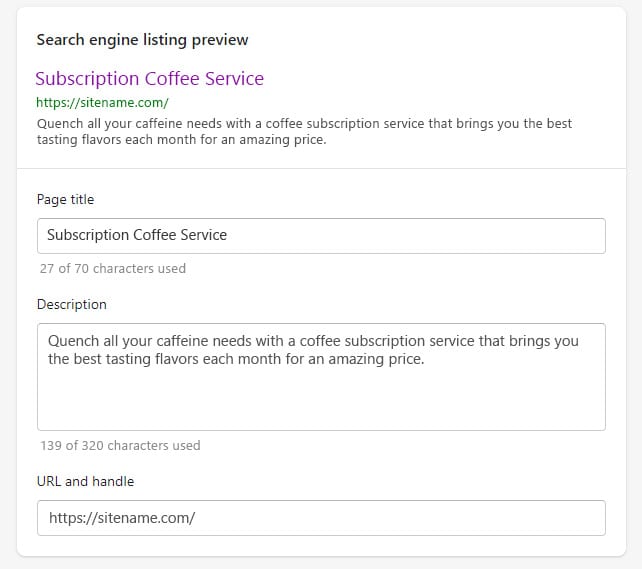
The bad news is that Google doesn’t use character limit to determine how much text to show on a results page. It uses pixel width.
Which means when optimizing your title tags and meta descriptions on Shopify, you could be using too much space, which can result in you creating a title tag/description that ends up getting cut off because it’s too long even though it fits Shopify’s limits.
Though this isn’t a huge issue and can easily be fixed, cleaning up your meta descriptions and title tags can make a big difference.
In fact, a study from Etsy found that shortening the length of your title tags can lead to an increase in ranking. And another study concluded that improving your title tags can increase your CTR by more than 20%.
So while you may believe that you’ve already checked editing your meta descriptions and title tags off your Shopify SEO Checklist, you may want to check again.
After all, the last thing you want to do is spend tons of time writing that “perfect” title and description that you finally got to fit within Shopify’s boundaries, only to find out it gets cut off on Google’s actual search results page.
Bonus Issue: Image Compression
As a bonus, I’ll introduce to you one additional Shopify SEO issue that I’ve seen past clients run into.
This issue is image compression.
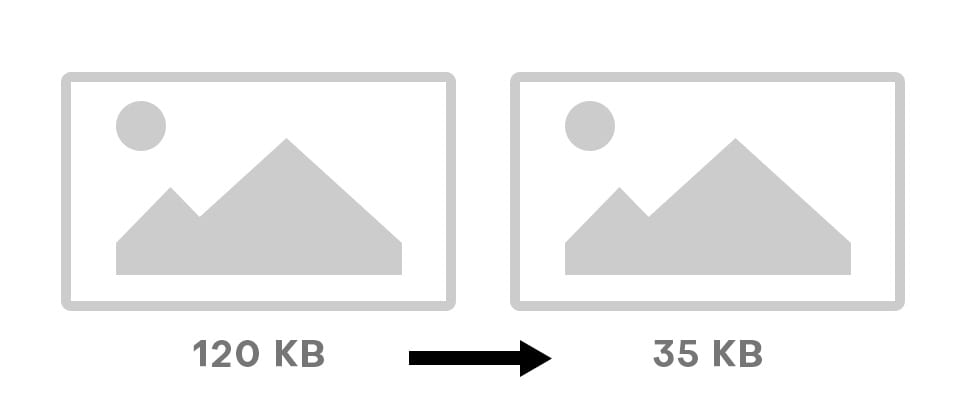
I’m going to guess there are a lot of pictures on your Shopify site.
And if you’ve uploaded most of them yourself, there’s a good chance you haven’t optimized for image compression, which means your photos are too big and are slowing your site down.
And while site speed may not be a major concern for you, it should be.
As this article from SEMRush points out, when your site load-time goes from 1 second to 5 seconds, the probability of a visitor leaving your site increases by 90%.
So if you have lots of large photos throughout your site, your site probably takes forever to load and causes visitors to leave your site.
Which means no conversion and no sale.
How You Can Instantly Fix These Issues
If you’ve read this far, or skimmed to this section of the post, you may feel that some of these issues are too complex for you to understand.
Which is totally ok. I’m here to help.
If you’re a do-it-yourself type of person, read on. All the answers to fix the 5 issues I mentioned are below.
But if these issues aren’t registering with you, or like many of our eCommerce clients, you simply don’t have the time or manpower to fix these on your own, let me point you in the right direction.
Working with a digital marketing agency that specializes in eCommerce SEO will make all the difference.
It has the expertise to not only identify, but instantly fix all of these inevitable SEO issues that your Shopify site will run into. That way you can focus on what you do best – running your business.
If that sounds like a path you’d be interested in taking, feel free to schedule a chat and I’ll tell you about other common issues with Shopify SEO that I didn’t include in this list.
Anyways, here are the solutions.
*Before editing any code on your site, I (and Shopify) strongly suggest you edit the theme only if you feel comfortable with HTML, CSS, and have a basic understanding of Liquid. If you do decide to edit your own code, always be sure to copy and save the original code before editing in case you make any mistakes along the way.
Duplicate Content
Fixing the issue of duplicate content is a simple process that can be applied to sites that are just starting out and have a small product line or well-established sites that offer thousands of products.
All you have to do is edit a few lines of code.
First, login to backend of your Shopify site and on the left-hand column go to Sales Channel > Online Store > Themes.
Next, click on the “Actions” dropdown menu on the right and hit “Edit Code.”
Then there will be a list of folders that appear on the left. Go to the “Snippets” folder.
From there, you’ll want to look for one of the following files (you may have to do some clicking around):
Product-card-grid.liquid | product-grid-item.liquid | product-swatch.liquid | product-thumbnail.liquid
that has this line of code:
{ { product.url | within: current_collection } }
Go to each place where this appears in the code and remove the “| within: current_collection” so it looks like this:
{ { product.url } }
And boom, problem solved. By editing the code on the theme level, you won’t have to do this for each individual category page.
Now your Shopify site will contain all canonical links and Google will have a clear understanding of which URL you want to rank for, helping you get on the first page of search results.
Of course, if coding isn’t your forte, you can always hire an eCommerce SEO company to do all of the heavy lifting for you so this issue can instantly be fixed.
Incorrect H Tags
The first step to fixing any incorrect H tags is to see if you have any. Luckily, not every Shopify theme runs into this issue.
To check your H tags, go to your homepage or a collections/category page.
Right click on the page, and from the dropdown menu click “View page source.”
Then hit “ctrl + F” to pull up the search bar and search “<H1”.
If there is only one H1 tag and it includes the correct page title, you’re all set.
If your page title (H1) is actually showing as your product titles (H2/3/4), you’ll need to visit the backend of your Shopify site and fix the code manually.
To do so, login to backend of your Shopify site and on the left-hand column go to Sales Channel > Online Store > Themes.
Next, click on the “Actions” dropdown menu on the right and hit “Edit Code.”
Then in the collection-template.liquid file, hit “crtl + f” to pull up the search bar and search: <h2
You should then see a code like this:
<h2 {{ collection.title }} </h2>
Change “<h2” to “<h1” and “</h2>” to “</h1>”
Then look for this line of code:
<h1 id=”product-title”>{{ product.title }}</h1>
And change the “<h1” to “<h2” and “</h1>” to “</h2>”
Now Google will have a strong sense of what each category page should be about and your single H1 tag will have more influence on search engines, helping you rank better in the long run.
Product Redirect Pages
Consolidating for old or expired pages on your site is a relatively easy fix.
After logging into your Shopify account, under the “Online Store” section, click on the “Navigation” tab.
Then click on the “URL Redirects” link.
Next hit the “Create URL redirect” button.
You’ll then be prompted to insert the old or expired URL into the “Redirect from” field and the URL of where you want visitors to land instead into the “Redirect to” field.
Lastly, click “Save redirect” and you’ve successfully avoided taking users to a 404 page.
If you’d like to take a closer look or manage any other redirects on your site, check out this article.
Robots TXT Files
Although Shopify doesn’t allow you to edit your site’s robots.txt file, there are a few additional ways to adjust what pages Google can and can’t crawl to help boost your SEO.
One way is to eliminate duplicate content by adding canonical tags, like I touched on in the Duplicate Content section.
Another way is to add the “noindex” tag to your site’s code.
The “noindex” tag is a tag that you can put into a page’s code to prevent it from being crawled by Google and showing up in search results.
To add a “noindex” tag to a page you don’t want to be crawled, first from your Shopify admin, go to Online Store > Themes
Go to the theme you want to edit and hit Actions > Edit Code.
Then click the liquid.theme file and copy and paste this code in the <head> section:
{% if template contains ‘search’ %}
<meta name=”robots” content=”noindex”>
{% endif %}
If you want to exclude a certain page, copy and past this code in the <head> section:
{% if handle contains ‘page-handle-you-want-to-exclude’ %}
<meta name=”robots” content=”noindex”>
{% endif %}
Be sure to change the “page-handle-you-want-to-exclude” to the actual name of your page handle.
Then click save and you’re all done. You’ve now hidden certain pages from Google to help improve your SEO.
Meta Descriptions & Title Tags
The solution to fixing your meta descriptions and title tags is very simple – make them shorter.
And while this doesn’t have to be applied to every single title and description on your site, it’s generally best to keep the length for these as short as you can.
For title tags, aim to use 55 characters or less.
Research from Moz backs this up, as they found that 90% of titles that were 60 characters or less displayed properly on a Google results page.
For meta descriptions, aim to use 155 characters or less.
If you’ve done any SEO research yourself, you may have found that longer meta descriptions – even ones that are truncated by Google – can actually produce a higher CTR.
While this is recognized to be true, this doesn’t mean that you need to use all 320 characters Shopify gives you to write your meta description.
You only need to use roughly 155-160 of the 320, because that’s generally the cutoff limit for Google.
So if you’ve created a meta description in Shopify that’s 300 characters and packed it with all this great info like your keywords and benefits and brand name, it might get cutoff in a bad spot and not include half – or more – of that info.
You still want to make sure you meta description takes up as much space as it can on a search results page, but within the boundaries of Shopify, you need to find that sweet spot of ~155 characters so all your valuable information can be included without being truncated.
That way your description will give potential customers a compelling, informative description that will increase their likelihood of clicking on your link.
Image Compression
There are a few great options to easily fix the issue of image compression.
The first is TinyJPG and/or TinyPNG. These are both free tools to reduce the size of your images.
Another option is to use Crush.pics. This is a free Shopify app that automatically compresses your photos without any quality loss.
Run your photos through these programs and your site speed will get the dramatic boost in speed it needs to keep users happy and on your site.
Conclusion
Hopefully you’ve found this Shopify SEO guide helpful and can apply what you’ve learned in this post to fix some of the issues on your own site – or use our Shopify SEO services so we can fix them for you.
That way you can finally get on the first page of Google and outrank your competitors in 2024.
Now I’d like to hear from you.
Which SEO issues have you experienced on Shopify? Were there other issues you want to know about?
Let me know in the comments below.